Robot Dresspack Selection Process: 5 Steps from Robot Model to BOM and Quotation
How a robot dresspack is specified in five steps: robot model and application, media and interfaces, axis routing concept, layout renderings, and BOM with quotation, plus a checklist of what to prepare.
A dresspack, the hose and cable package carried on the robot arm, connects the end-effector to the plant. It decides whether a robot cell runs reliably or suffers hose wear, snagging and unplanned downtime.
Selecting a dresspack is not a parts-picking exercise. It is a short engineering process with five steps, S1 to S5. This guide walks through each step and shows what we need from you at each stage.
Rule of thumb: the application defines the media, the media define the diameters, and the diameters define the routing.
The five steps at a glance
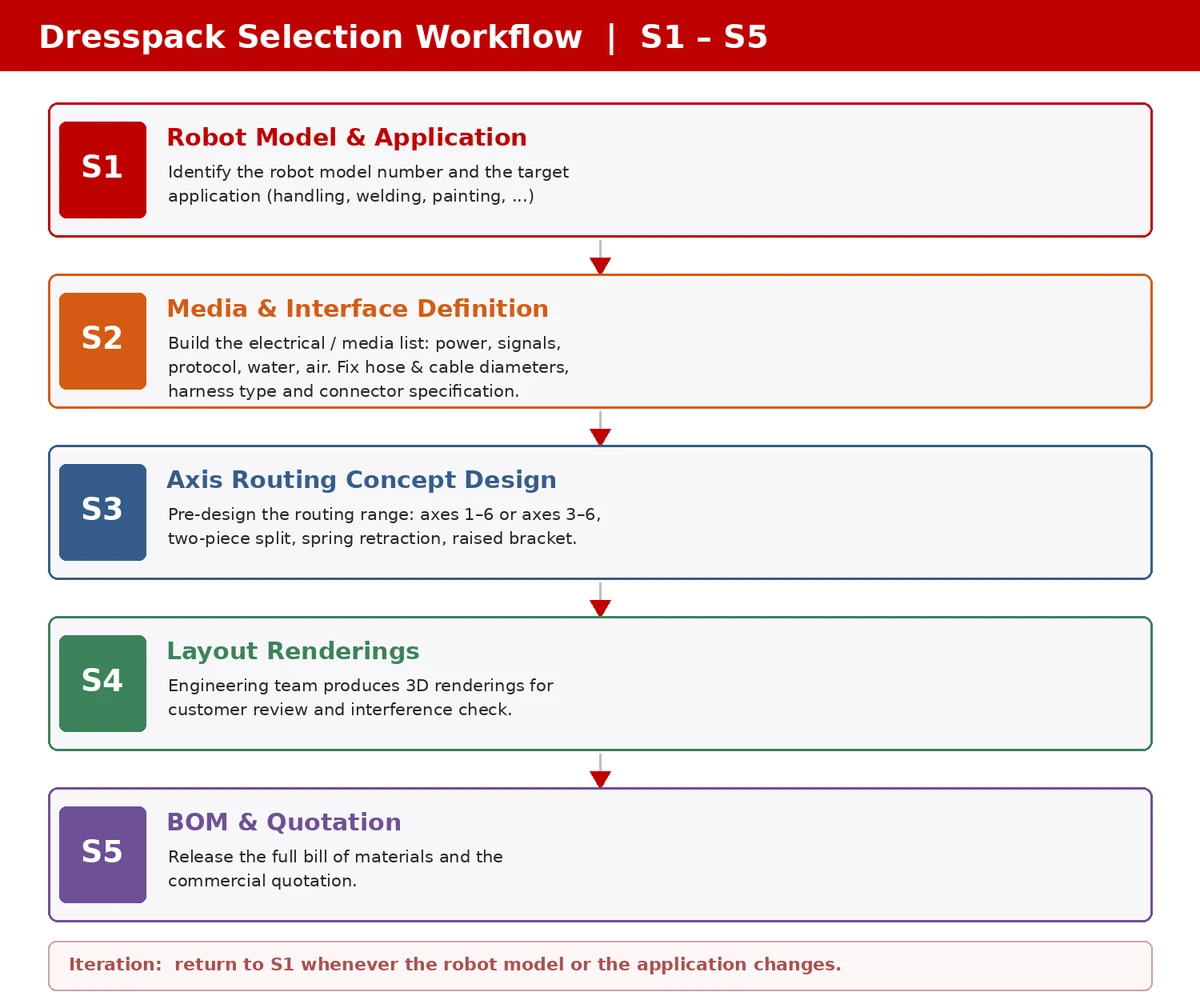 Robot dresspack selection workflow, steps S1 to S5
| Step | Name | Input | Output |
|---|---|---|---|
| S1 | Robot model & application | Your enquiry, cell concept | Confirmed robot model and application |
| S2 | Media & interface definition | Application, end-effector | Media list, hose and cable diameters, harness and connector type |
| S3 | Axis routing concept | Media list, robot geometry | Routing range and slack-management design |
| S4 | Layout renderings | Routing concept | 3D renderings for your review |
| S5 | BOM & quotation | Approved renderings | Bill of materials and quotation |
S1: Robot model and application
Two things come first: which robot, and what it will do.
- Robot model: brand, series, payload and reach. The model determines the arm geometry and the mounting points for the dresspack. Always give the complete model number, including every suffix; see How to Read Industrial Robot Model Numbers.
- Application: the application decides which media must reach the wrist, and therefore the whole design that follows.
| Application | Typical media |
|---|---|
| Handling | Power, signals |
| Assembly | Signals, compressed air |
| Inspection | Signals, camera / Ethernet |
| Welding | Power, air, cooling water |
| Palletizing | Power, signals |
| Glue / sealing | Glue hose, heater power |
| Painting | Paint, atomizing air |
| Patrol inspection | Signals, camera |
If the robot model or the application changes later, the process starts again at S1.
S2: Media and interface definition
Next, we build the complete list of media that must be routed to the wrist.
| Media type | What to confirm |
|---|---|
| Electrical power | Welding current, motor power |
| Signals | Digital I/O, encoder, safety |
| Fieldbus | PROFINET, EtherNet/IP, DeviceNet |
| Water | Cooling circuits for torch or gun |
| Compressed air | Actuators, blow-off, atomizing air |
| Process media | Paint, glue, sealant |
For each line, three details are then fixed:
- Hose / cable diameter, which follows from current, flow rate or number of cores. The total bundle then determines the corrugated hose size; see Robot Dresspack Hose Sizes Explained.
- Harness type: one continuous harness, or a split design with an interface on the arm.
- Connector specification: pin count, coding and protection class.
Confirmed diameters are the key output of S2. Without them, no routing concept can be dimensioned.
S3: Axis routing concept
Now we define which part of the robot the dresspack covers and how hose slack is managed.
| Option | Description |
|---|---|
| Axes 1–6 | Full routing from the base to the wrist in one package |
| Axes 3–6 | Only the upper arm is dressed |
| Two-piece | Split design with a connector interface on the arm |
| Spring retraction | A return spring pulls the hose back to absorb slack |
| Raised bracket | Elevated mounting on the arm for extra clearance |
The routing range (axes 1–6 or 3–6) is combined with the other options as the cell requires. A routing that looks clean on paper can still foul a fixture at full axis travel, so the concept is always checked against the real working envelope.
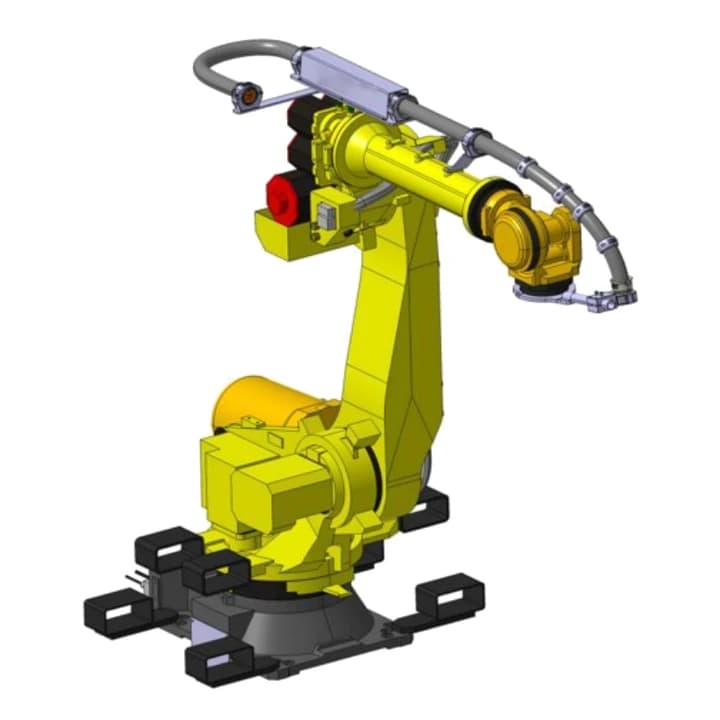 Dresspack routed on the upper arm only (axes 3–6)
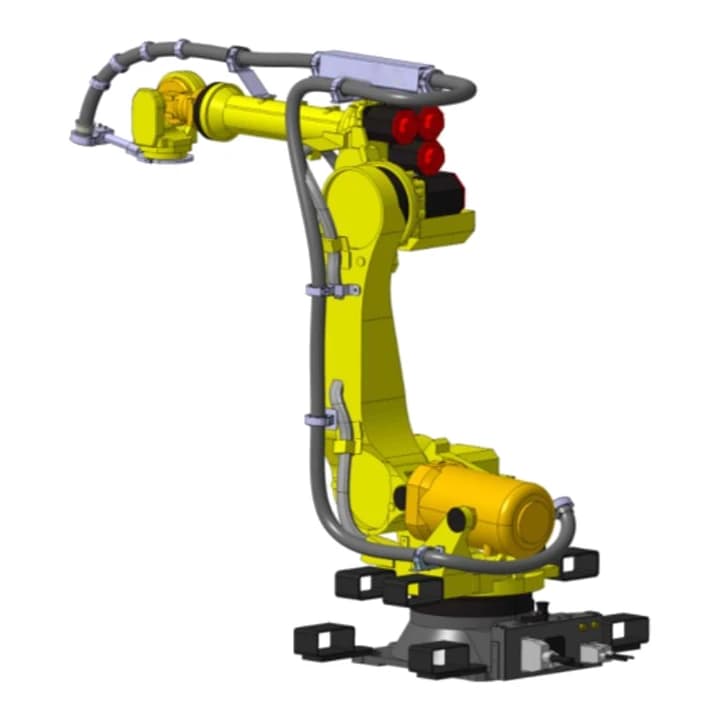 Dresspack routed from the robot base (axes 1–6)
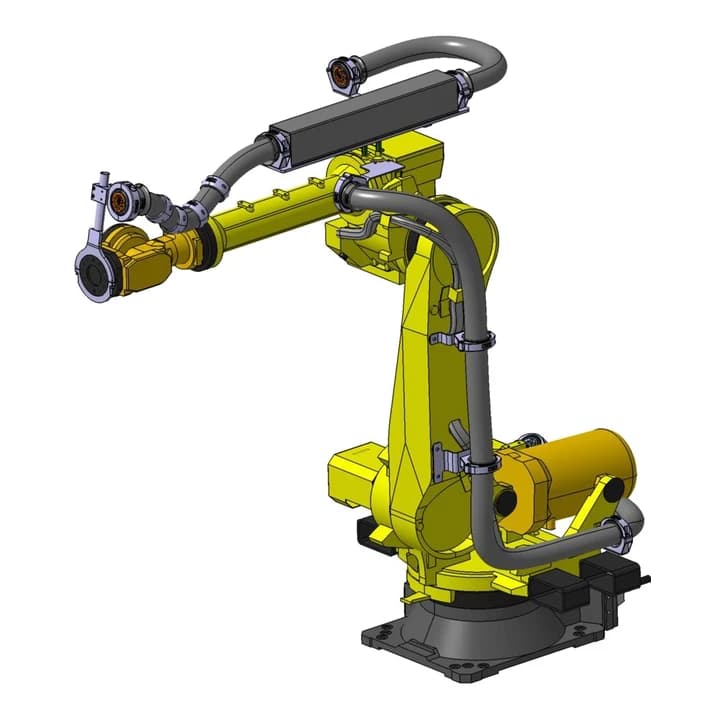 Dresspack routed from the robot base (axes 1–6), alternative layout
When reviewing a routing concept, check three things in particular:
- Clearance at the extremes of travel: the hose must not stretch tight or foul the fixture.
- Wear points: the base, the elbow and the wrist deserve the closest attention.
- Serviceability: can the hose be replaced without dismantling the cell?
S4: Layout renderings
Our engineering team produces 3D renderings of the agreed concept, showing:
- dresspack routing on the arm,
- bracket positions,
- connector locations,
- clearances at the extremes of travel.
The renderings serve three purposes: your confirmation, an interference check against fixtures, and the basis for the quotation. Approved renderings are the gate before the BOM is released.
S5: BOM and quotation
With the concept approved, we release the bill of materials and the quotation.
- BOM: hoses and cables with diameters, connectors, brackets and clamps, spring or retraction units.
- Quotation: materials and assembly.
- Revision control: the BOM revision is tied to the approved rendering, so later changes can be traced.
Checklist before quotation
| Step | Item to confirm |
|---|---|
| S1 | Robot model, payload and reach |
| S1 | Application |
| S2 | Full media list (power, signals, fieldbus, water, air, process media) |
| S2 | Hose and cable diameters |
| S2 | Harness type and connector specification |
| S3 | Routing range: axes 1–6 or 3–6 |
| S3 | Two-piece, spring retraction or raised bracket |
| S3 | Interference check against the working envelope |
| S4 | Renderings approved |
| S5 | BOM released, revision tied to the rendering |
Start your dresspack project
To start at S1, send us:
- Robot brand and full model number (a nameplate photo works too)
- Application
- Cables and hoses to be routed, with their diameters, if already known
- Photos or drawings of the current setup, if available
Fadeya designs and builds custom dresspacks for ABB, KUKA, FANUC, YASKAWA, Kawasaki, EFORT, ESTUN and collaborative robots including JAKA, AUBO, Techman (TM) and SIASUN.
- Browse Robot Dresspack products
- Replacing a LEONI / BizLink proflex hose? See the LEONI cross-reference
- Ready to start? Request a quote
ABB, KUKA, FANUC, YASKAWA, Kawasaki, EFORT, ESTUN, JAKA, AUBO, Techman, SIASUN, LEONI, BizLink and proflex are trademarks of their respective owners. Fadeya is not affiliated with these companies.